Up next in 10


Join our Patreon community for an AD-FREE website experience, extra content, access to our private Discord server, and more: https://www.patreon.com/chromeunboxed
・・・・・・・
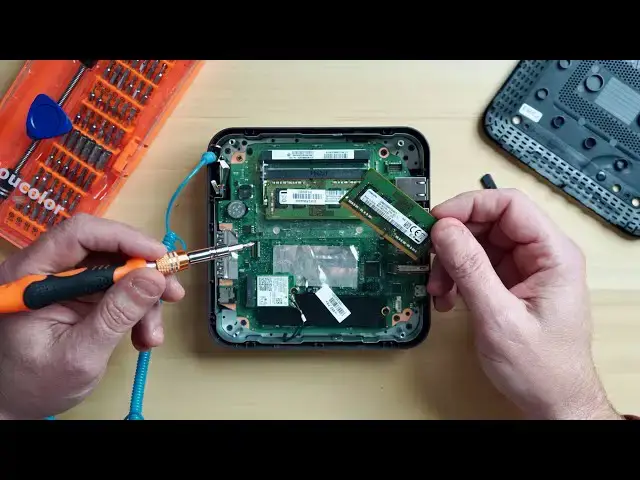
Today, we're taking a look at how to upgrade the RAM in the CTL Chromebox CBx2.
Shop CTL Chromeboxes: https://bit.ly/2PQrXu6
Shop Crucial RAM: https://fave.co/2MV3NRO
Special thanks to CTL for providing the Celeron Chromebox for this video.
Read more: https://chromeunboxed.com/how-to-upgrade-ram-on-the-ctl-chromebox-cbx2/
Join our newsletter: http://bit.ly/2WjCDm7
・・・・・・・
Shop Chromebooks on CHROME SHOP: https://chrmshop.com/
Subscribe to the channel: http://bit.ly/2xFuj6L
Show More Show Less View Video Transcript
0:00
hey what's up everybody uh today we're
0:01
talking chrome boxes more specifically
0:04
upgrading chrome boxes uh we're gonna
0:05
take the ctl apart
0:07
show you just how easy it is to upgrade
0:09
the ram in one of these uh new
0:11
generation of chrome boxes so
0:13
let's dive right in
0:19
[Music]
0:26
before we tear down this chrome box
0:28
let's talk for a second about tools uh
0:29
having the proper tools for a job like
0:31
this
0:31
makes all the difference in the world
0:33
and i recommend you go out you can pick
0:35
out
0:35
one of these kits like this on amazon
0:38
best buy wherever for about 20 bucks
0:40
it has all of your tips it's going to
0:42
have all your pry tools and
0:44
more importantly it's going to have this
0:46
this is a grounding strap
0:47
i've joked about these in the past and i
0:50
get a lot of flack about them
0:51
but you do need to wear a grounding
0:53
strap i have borked more than one device
0:56
because i did not wear one of these
0:58
all this does is neutralize the charge
1:00
between you and the device that you're
1:02
working on and yes you need to use it
1:04
and yes you need to use it every time
1:06
because the first time you do not
1:08
you will fry the motherboard on your
1:10
computer and then you don't have a
1:12
computer
1:13
so that said i'm going to put this on
1:15
and we're going to take this chrome box
1:16
apart
1:17
all right grounding straps on we're
1:19
ready to go for this
1:20
i have a 4 gig stick of samsung ram this
1:24
is ddr3 you can use ddr4 these newer
1:27
chrome boxes can handle that just fine
1:29
just make sure you're getting a 204 pin
1:32
i recommend crucial
1:33
simply because it's a little cheaper and
1:35
they actually have a chrome box section
1:37
on their site so you know you're going
1:39
to get
1:40
a stick of ram that's going to fit this
1:43
is a ctl
1:44
celeron 5205 so it's a comet lake with 4
1:47
gigs of ram
1:48
and we're going to show you just how
1:49
easy it is to add an extra 4 gigs
1:51
you can go all the way up to 32 if you
1:53
want it's a little overkill for a
1:55
celeron if you have the i7 model and you
1:57
want to do that
1:58
the process is going to be exactly the
2:00
same so let's get started
2:02
you flip the device over and on the
2:03
bottom you're going to notice there are
2:05
two rubberized feet here they're
2:08
self-adhesive so you just need
2:10
a little pry bar plastic pry tool like
2:12
this it came in the kit that we
2:13
purchased
2:14
you're just going to want to pry these
2:16
up and they will peel right off
2:18
just set those aside the cool thing
2:20
about this
2:21
is there are only eight screws to take
2:23
apart and they are all identical you
2:25
don't have to worry about whether or not
2:26
your screws are separated or
2:28
you you get a mismatch or whatever i'm
2:31
using the
2:31
screwdriver from our kit this is a 2.5
2:34
phillips
2:35
found that that fits perfectly on these
2:38
i'm just going to take these four screws
2:40
out of the base
2:46
i didn't forget about the grounding
2:47
strap we'll get there in just a second
2:51
all right so you're going to take these
2:53
four screws out
2:55
set those aside if you have a static pad
2:58
or something like that where you can set
2:59
your screws that's even better
3:01
this base should pop right off if it
3:03
doesn't you can pry it open with the pry
3:05
tool
3:05
and then you're going to see a metal
3:07
plate here on the bottom
3:08
now is a good time to get your grounding
3:10
strap and just find some bare metal on
3:13
the device
3:15
i'll go ahead and let you know up front
3:16
i have the power supply disconnected on
3:18
this one so it's not that big of a deal
3:20
but you're going to want to find just a
3:21
piece of bare metal on the inside not
3:23
painted metal painted metal is not going
3:25
to ground because it's painted
3:26
clip that to that out of sight out of
3:29
mind you're ready to go
3:30
we have four more screws in the same
3:32
place let's go ahead and take those four
3:34
screws out
3:37
and once you get them out just be
3:39
careful you don't want to just
3:40
yank this thing out it has all of your
3:42
ports on it and there
3:44
is one wire that is connected to this
3:46
base and if you yank it out you might
3:48
break it and you don't want to do that
3:50
because then
3:51
you're going to be buying a new chrome
3:52
box ctl does customize their chrome
3:55
boxes you can order this celeron and
3:57
upgrade the ram there
3:59
and it's not that expensive but if
4:00
you're a tinkerer or if you buy one and
4:02
you just decide down the road you want
4:04
some more ram
4:05
you could do it yourself or if you just
4:06
want to save a little bit of money so
4:08
just pry that
4:09
piece up and move it out of the way
4:14
if you want you can actually slide this
4:18
off
4:18
and take this completely out of the way
4:20
it's not that big of a deal if you don't
4:22
want to
4:22
i find it's easier just to set it aside
4:25
the only difference between this model
4:27
and the previous model is this this is
4:30
just a
4:30
metal heat shield that sits over top of
4:32
the ram there's
4:34
four fins that it slides down into so
4:36
you literally can just grab it
4:39
and pull it straight off another reason
4:42
why you do want to have the grounding
4:43
strap because you're taking a chance on
4:45
metal touching metal
4:46
do be careful when you pop it out
4:48
because the power supply actually mounts
4:50
to the board right here i haven't moved
4:52
out of the way but if you pop this off
4:54
too hard
4:55
you could easily break that power supply
4:57
off the board
4:58
but you will see now here is the
5:01
installed four gigs of ram
5:03
it has two slots so there's no need to
5:05
mess with that one that's already in
5:06
there
5:07
you're just going to take your new ram
5:10
line it up
5:12
slide it in and press down until
5:15
these little spring load clips pop in
5:19
and that's it you're good to go if you
5:21
did decide why you're in here you wanted
5:23
to
5:23
upgrade the storage or anything like
5:24
that the storage on these chrome boxes
5:26
is located here
5:27
you have to take this wi-fi card off
5:29
with this single screw
5:31
then take the screw out here and slide
5:33
in your new storage but other than that
5:34
you're good there's nothing you have to
5:35
do on the software side to add this ram
5:38
you just pop it in put it back together
5:41
power it on
5:42
and it's gonna recognize that it now has
5:43
eight gigs of ram instead of four
5:45
again you could do two eight gig sticks
5:47
you could do a four and a two
5:49
you could do two sixteens if you wanted
5:51
to but that's it guys
5:52
you're just going to reassemble it just
5:54
the same way we took it back apart
5:57
i have found that these tend to lose
5:58
their sticky after you take them off a
6:00
couple of times you can just buy some
6:02
you know aftermarket double-sided tape
6:04
and put them back on there or you don't
6:05
have to put them back on there at all
6:06
other than that there's nothing else to
6:08
do to put new ram in this device so
6:11
i actually did this video because i got
6:13
an email the other day from someone who
6:14
was looking at purchasing one of these
6:16
for one of their institutions and he
6:18
wanted to make sure that this was
6:20
relatively simple to do and on a scale
6:22
to 1 to 10
6:23
it's about a 3. just make sure you have
6:25
the right tools
6:27
make sure you have the grounding strap
6:29
other than that there's really not a lot
6:30
you can do to mess this
6:32
up it's fun to tinker with stuff like
6:33
this i love doing stuff like this
6:35
and with all the new chrome boxes on the
6:37
market we're hoping to get some more on
6:38
hand because every device is a little
6:40
bit different
6:41
and we really would like to do one for
6:43
each chrome box that's out there because
6:45
some of them are going to be more
6:46
difficult than others
6:47
some of them might not be worth your
6:49
time other than that guys that's been it
6:50
for this one if you like the video give
6:52
us a thumbs up
6:52
hit that notification bell and don't
6:54
forget to subscribe because we've got a
6:55
lot more stuff coming your way
#Computer Components