

Support our independent tech coverage. Chrome Unboxed is written by real people, for real people—not search algorithms. Join Chrome Unboxed Plus for just $2 a month to get an ad-free experience, access to our private Discord, and more. Learn more about membership here.
START FREE TRIAL (MONTHLY)START FREE TRIAL (ANNUAL)
Earlier this week, I made the case as to why a new Chromebox could be the perfect home PC option for a lot of consumers. Shortly thereafter, I received an email from a reader that was interested in CTL’s “Buy and Try” program that offers deeply discounted devices for eligible customers so that they can try out a new Chrome device before making a larger purchasing decision for their school or business. The question was asked, “how easy is it to upgrade the RAM in the CTL Chromebox CBx2?” The answer? Quite easy. So, we decided that it would be a good idea to walk you through the simple steps to add some RAM to the CTL Chromebox in case you’re looking to upgrade. CTL does offer customized upgrades and you can get as much as 32GB of RAM when you order a new Chromebox but maybe you already have one or you just want to save some money by doing it yourself. Either way, we threw a quick video together to show you how.
Before you go cracking open your Chrome OS mini PC, there are a couple of things you’ll need. First and foremost, you will need some new RAM. The base model of the Chromebox CBx2 comes with 4GB but it has two RAM slots so you can add another stick and add to the already existing RAM. Comet Lake Chromeboxes can support DDR3 or DDR4 RAM but which you buy is really up to you. For the video, I used a stick of Samsung DDR3 but we recommend Crucial because they are generally more cost-effective and they have a Chromebox section on their site so you know you’re getting a stick of RAM that will fit in your device. These particular sticks are 204 pin. Whatever you buy, make sure you do a little research to ensure it will work with your box.
Next up, you need some tools. While any small screwdriver set will get you into the Chromebox, it’s good to have a toolkit that’s designed specifically for PC work. These kits include things like plastic pry tools and most importantly, a grounding strap. I have joked about these in the past but seriously, you should always wear a grounding strap when working on a PC to prevent static discharge that can permanently brick your device. The one I use ran me about $19 on Amazon but you can find them at just about any online electronics retailer. Now you’re ready to get to work.
The CTL Chromebox CBx2 is relatively easy to open up. You simply flip it over and remove the two self-adhesive rubber feet and then, remove the four Phillips head screws that hold down the plastic outer case. I used a 2.5 Phillips bit and it fits perfectly. If you do end up buying a new toolkit, I highly recommend getting one that has magnetic tips. I have large hands and it makes handling these tiny screws a lot easier. You may need to pry off the plastic case with one of your pry tools but it pops off very easily. Set that aside and now it is time to don your grounding strap as we will be touching metal from here on out. Between the outer frame and the motherboard, you should see a strip of bare metal that composes the frame. Attach the grounding strap snuggly to your wrist and then, clip the alligator clamp to that piece of bare metal. Just make sure you do not clamp it to anything that is painted. Painted metal won’t ground.
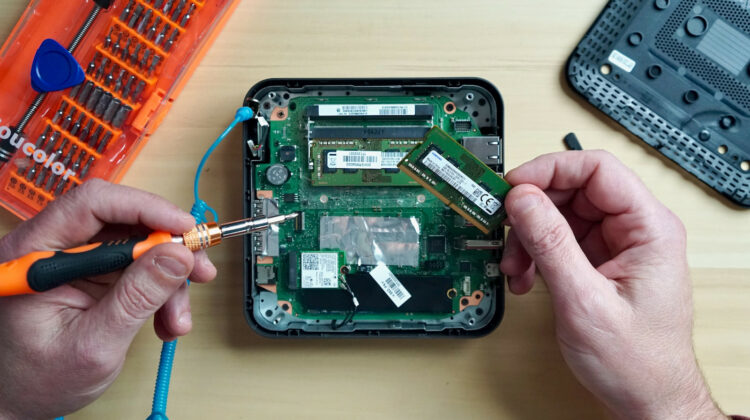
Now, remove the four Phillips screws that hold down the interior metal plate. Once you have those removed, gently remove the metal plate but be gentle. It has a wire harness attached to it that is attached at the other end to the motherboard. You can remove that pin connector from the motherboard if you like but you don’t have to. Just be sure to move it aside and mind the wire harness while you’re working. Now that we’re inside, you should see a small metal box about the size of your RAM stick. This is just a shield that houses the RAM and it is held in place by four small fins. There’s no magic trick to remove this shield. Simply grab it firmly and pull straight up. Be careful to avoid popping it off to the right or left. there is a small wire harness next to it that connects the power button. You can easily damage that if you hit it while removing this piece.
Once removed, you should see the original factory RAM in the first slot and the second, empty slot above it. If you are just adding a second stick of RAM, gently slide it into the slot and push down until the spring-loaded arms snap into place on either side of the RAM. If you are putting two new sticks of RAM in, remove the original by pressing outward on the arms on each side and the RAM should pop up and easily slide out. Once your new RAM is in place, replace the metal shield by sliding it in between the four metal fins and reassemble the Chromebox. That’s it. There’s nothing else to do. Once you power on your Chromebox, Chrome OS should automatically recognize the new amount of RAM.
If you have a different brand of Chromebox, the process should be somewhat similar but some devices are tougher than others. We’re going to get our hands on some different models so we can show you how to upgrade each of them. We’ll also cover how to upgrade the storage in your Chrome OS mini PC so stay tuned.
SUBSCRIBE TO UPSTREAM
Get Chrome Unboxed delivered straight to your inbox
Upstream is our flagship, curated newsletter with the top stories, most click-worthy deals, giveaways, and trending articles from Chrome Unboxed sent directly to your inbox a few times a week. Join 31,000+ subscribers.