With the addition of the Google Play Store to Chromebooks and the advent and surge in popularity of web applications, your Chromebook’s launcher can become overwhelmingly messy pretty quickly. Being able to add any website to your shelf as an icon (Now called Creating a shortcut) and display it among your apps is an awesome functionality, but before you know it, you can have hundreds, depending on your workflow. Today, we’re going to be discussing some tips and tricks for making sense of your launcher as you begin to fill it will experiences.
Even with an organized launcher, I often default to using my Chromebook by tapping the search key, typing in the first few letters of the app that I want to open and hitting ‘enter’ to select it from the suggestions. It should be noted that the best way to use your Chromebook is to just search for things. I recently read an article where the author stated that they wished Google would stop trying to ‘make the search key happen’, but I would argue that it’s core to the Chromebook experience and for good reason. Our lives revolve around search and caps lock was originally created for typewriters and internet trolls. Even still, it can give you a sense of ownership and mental clarity to have your apps organized into appropriately named folders.
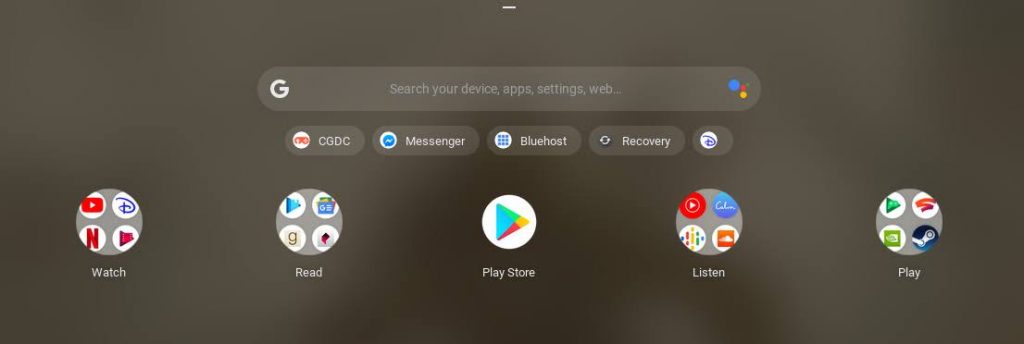
Being that most of us use our Chromebooks for consuming content as a primary function, I recommend using the first row of your launcher to mimic what I have in the photo below. Having a folder for each type of content – things you watch, read, listen to or play – right on top feels like a natural setup. You can place the Play Store smack dab in the middle of them so that getting new experiences is central to your view. It also retains the symmetrical layout of the five row structure and keeps all of these by themselves on row one. You can use the second row of your launcher to mimic the items you have on your shelf. For example, if you use the Files app, Google Photos, the Chrome Browser, Gmail, Calendar, Google Keep, etc. on your shelf, add these in that same order to the second row and so on of your launcher. Doing so can give you a sense of unification between your launcher and shelf.

Naming each of your folders using verbs can help as well. When you open your launcher, you’re opening it to DO something, right? Using this one trick alone can help you quickly get your bearings when you start looking around. Some suggestions for folders include the aforementioned ‘Read’, ‘Watch’, ‘Listen’, ‘Play’ – as well as things like ‘Learn’, ‘Pay Bills’, ‘Travel’, ‘Discuss’ (or ‘Chat’), ‘Shop’ and so on. You can place things like Facebook Messenger, Discord, Google Hangouts and Android Messages in the ‘Chat’ folder. You can organize things like Google Flights, Maps, Trips, Duolingo, Trip Advisor and so on into a ‘Travel’ folder. You get the idea.
You can also just take the approach of naming your folders topically. Some examples include, but are not limited to, ‘Learning’, ‘Writing’, ‘Social’ or ‘My Company’ if you run a business (or simply the name of your company). I like to turn every website I use to pay each of my bills into a shortcut and place them into a ‘Finance’ or ‘Money’ folder. If you’re learning a specific language like Japanese, you can place all of your web apps like Duolingo, Wani Kani or RomajiDesu into a folder with the name ‘Japanese’. Get creative and make an organization system that works best for you! Your launcher is another place that allows you to add a sense of ownership and personality to your Chromebook and the internet has infinite possibilities for resources you can turn into icons. Websites are the new software for many of us, after all. Keep in mind as well that your apps and web apps synchronize across your Google account, so they will be available to you in the folders you specify should you switch to a new Chromebook. If you’re experiencing an issue where your apps do not retain their organization after a reboot, this is something we’re actively investigating).

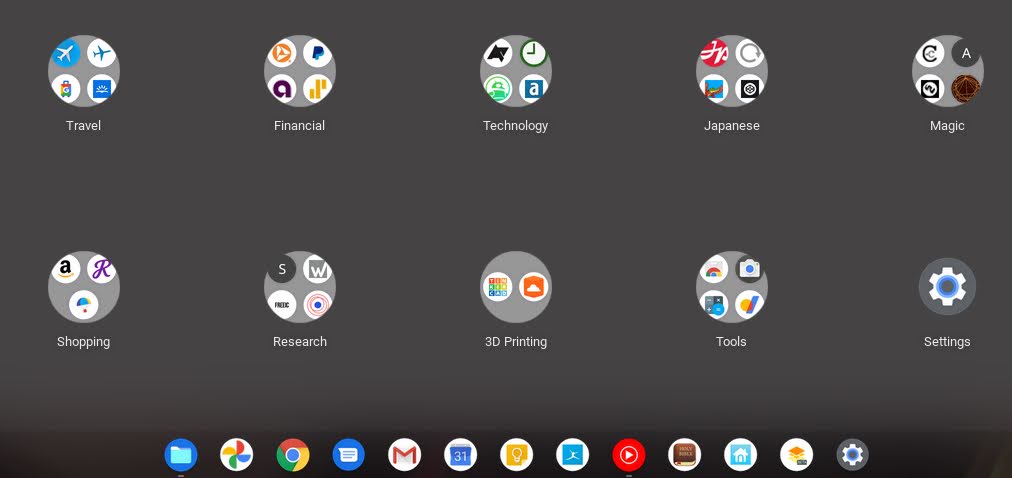
Another thing to keep in mind is that the first page of your launcher, being the most accessible, should house your most important or most frequently used experiences for quick access. The ‘Recents’ section at the top of your launcher is great, but it only keeps record of the five most recently opened apps. Subsequent pages of your launcher can store everything else. This is why I like to make the ‘Tools’ folder and the Settings icon the last items on the first page of my launcher (pictured above). It feels like a bookend to have the settings icon last (I do this with my shelf too, as you can see). Your ‘Tools’ folder can house things like your camera, calculator, the Chrome Web Store and more. Anything that you won’t utilize that often and need it out of the way.
Always spend some time here and there organizing any new apps or web apps you’ve created or downloaded into folders to keep everything tidy and in control. I should mention that I have met several people who dislike folders altogether. For those of you who aren’t opposed, I certainly hope these tips and tricks will help you gain clarity and be more productive while using your Chromebook!
Join Chrome Unboxed Plus
Introducing Chrome Unboxed Plus – our revamped membership community. Join today at just $2 / month to get access to our private Discord, exclusive giveaways, AMAs, an ad-free website, ad-free podcast experience and more.
Plus Monthly
$2/mo. after 7-day free trial
Pay monthly to support our independent coverage and get access to exclusive benefits.
Plus Annual
$20/yr. after 7-day free trial
Pay yearly to support our independent coverage and get access to exclusive benefits.
Our newsletters are also a great way to get connected. Subscribe here!
Click here to learn more and for membership FAQ

