


Support our independent tech coverage. Chrome Unboxed is written by real people, for real people—not search algorithms. Join Chrome Unboxed Plus for just $2 a month to get an ad-free experience, access to our private Discord, and more. Learn more about membership here.
START FREE TRIAL (MONTHLY)START FREE TRIAL (ANNUAL)
For some, Chrome OS is not only their OS of choice, it’s their only OS. For others, like myself, using Windows or macOS is an unavoidable part of our jobs. Despite how much I love my Chromebook, I can’t use it to do full-scale game development, mostly due to it not being realistic or reasonable to compile Unreal Engine on a Linux kernel for compatibility reasons. That’s not to mention the obvious limitations of most Chromebook hardware when compared to my custom-built Windows desktop development environment.
For others still, Windows or macOS remains a requirement for their workplace as some companies simply aren’t on board with Chromebooks yet. I’ve seen companies straight up just not invest the time and energy in learning whether or not it would be a viable alternative for them. Many companies, though, use legacy Windows software in the form of executable files that simply aren’t meant to run on Chrome OS. Others still prefer the full-fledged Microsoft Office suite or Adobe Creative Cloud as opposed to alternatives or the scaled-down versions of these apps that exist on the Google Play Store. I can’t blame them.
Today, I want to go over something I discovered while running my Windows and Edge experiment last week when I wrote Edge, Chrome, and the user between article. While there’s always the ability to use Chrome Remote desktop in order to remote into a Windows machine and use it temporarily, we’re instead going to cover how to make the most of directly using Windows 10 as a Chromebook user as I believe it will provide a better experience.
Install and access your Chromebook web apps
Every Chromebook user knows that their apps and web apps are the core of their device’s experience. Shifting over to Windows – even for a short time – can feel pretty jarring. While Android apps aren’t available on Windows (aside from something like Bluestacks, which is outdated and inefficient) your web applications can be used to give you a more consistent experience across device operating systems. Thanks to the Chrome browser synchronizing these for you, it doesn’t need to feel like you’ve gone back to the stone age and you’re not forced to type website URLs into Chrome’s Omnibox in order to navigate the world wide web.
Instead, just open your Chrome browser on Windows 10, open a new tab, and on the bookmark bar to the far left of the window, you’ll see a colorful square made up of nine other smaller squares that says ‘apps’. If you look closely enough, you’ll see that the colors that make it up form a Chrome browser logo, but that’s just a fun Easter egg. If you don’t see it, you can also just type in ‘chrome://apps’ and hit enter. Clicking on ‘Apps’ reveals all of the web applications from your Chromebook!
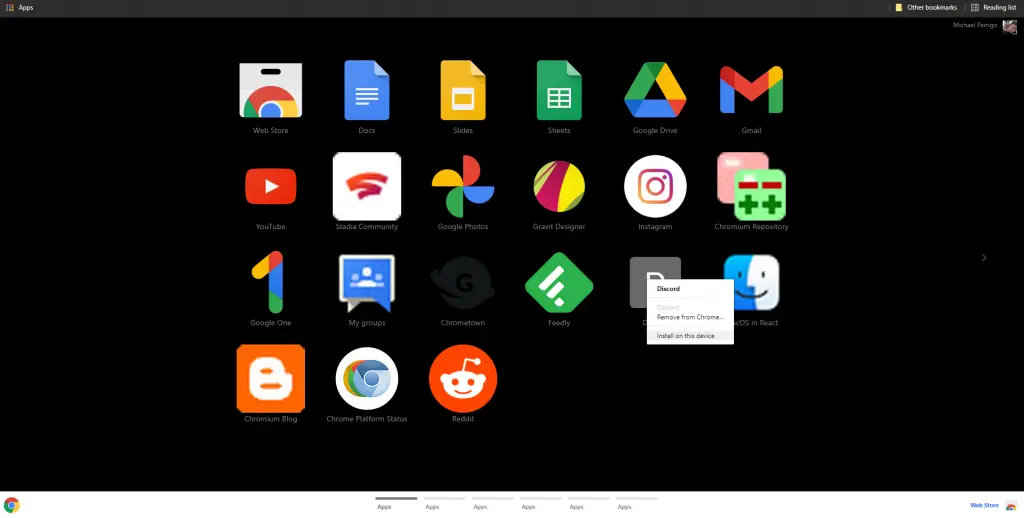
While entirely impractical to access them here as they are not exactly searchable, they feature low-resolution icons in many cases, and they’re just huge and chunky (Google, please modernize this!) let’s go ahead and ‘install’ the ones we want to use on our Windows 10 machine. Right-click each icon that you are interested in, and click ‘Install on this device’. Yes, this, unfortunately, needs to be done one at a time (modernize this too!), but once you’ve finished, you’ll have access to everything directly through the Windows Start button and search. While Microsoft’s search isn’t very good in my opinion, it’s better than nothing.
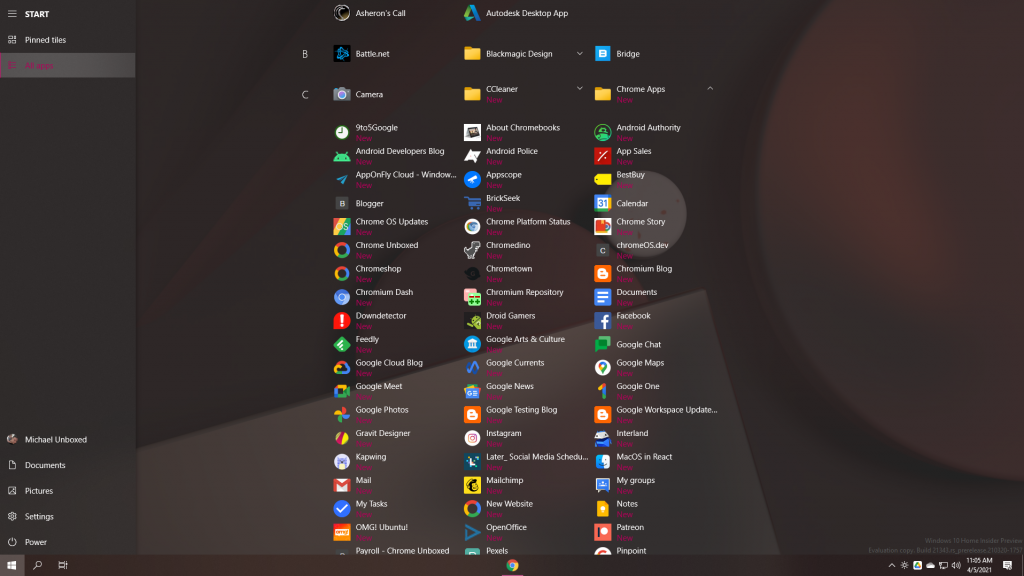
Clicking Start > All apps > Chrome Apps will reveal all of your web apps as well. It’s no Chromebook launcher, and it sure is ugly, but it gets the job done. I should also mention here quickly that if you add new web apps to your Chromebook, they do not synchronize automatically to your Windows machine – you’ll have to go ‘install’ those manually as well. Remember, you can also right-click these and pin them to the taskbar or start menu for quick access.
Use Google Drive File Stream
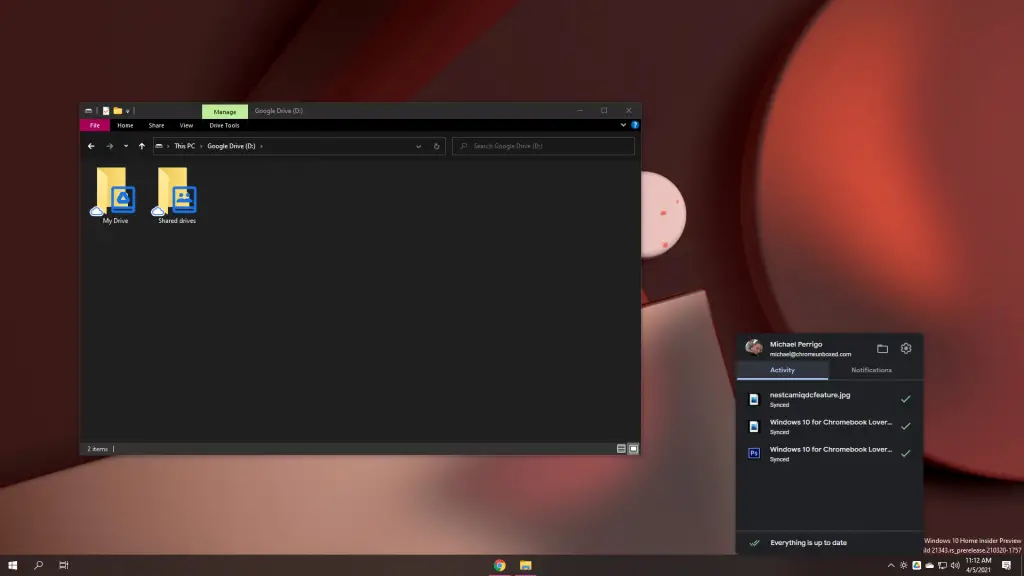
Using Google Drive on a Windows machine used to equate to downloading a file, changing it, and re-uploading it through the web browser. Then, Google moved on to Drive Backup & Sync, which would act much like a local Dropbox folder for all of your Google files. However, the old sync tool was pretty crappy, and missed syncing many files, and failed to operate instantaneously. Now, Google offers Drive File Stream for Workspace, which instantly ‘streams’ your files to you instead of requiring you to download them. This forces your Windows 10 device to operate much like the Chromebook Files app, and here’s a little secret – it’s available to regular users too! Once you’ve got this setup, you’ll feel right at home with your files while you’re away from your Chromebook. An icon for File Stream appears in your system tray and you can see the progress of the synchronization of your files and such with a single click.
Force Windows to search Google instead of Bing
Maybe I’m just biased, but as I said in my Edge experiment article, Bing is just, well, how do I put this? It’s just not good. During my time using it, it produced less accurate and relevant search results nearly every single time compared to Google Search. Regardless of how many ‘Scroogled’ ads you’ve seen, Bing just doesn’t live up to my expectations. However, having Google search be one tap away as with a Chromebook is important to those who use Chrome OS on the regular. Having to go to a new Chrome tab and begin searching for something adds a few extra steps, so installing the Chrometana Pro extension from the Web Store will allow you to morph your Windows Search into a Google search bar!
Just be aware that Chrometana is not Chrometana Pro, so be sure to install the latter instead. Once you have done so, follow the instructions that open up in a new tab in order to download, install, and set up Edge Deflector. If all else fails, you can also completely uninstall Edge from your machine, and despite many people cautioning me against this or saying it’s wasn’t possible, it’s was, I did it, and I don’t regret it.
Make use of Chrome notifications and the action center
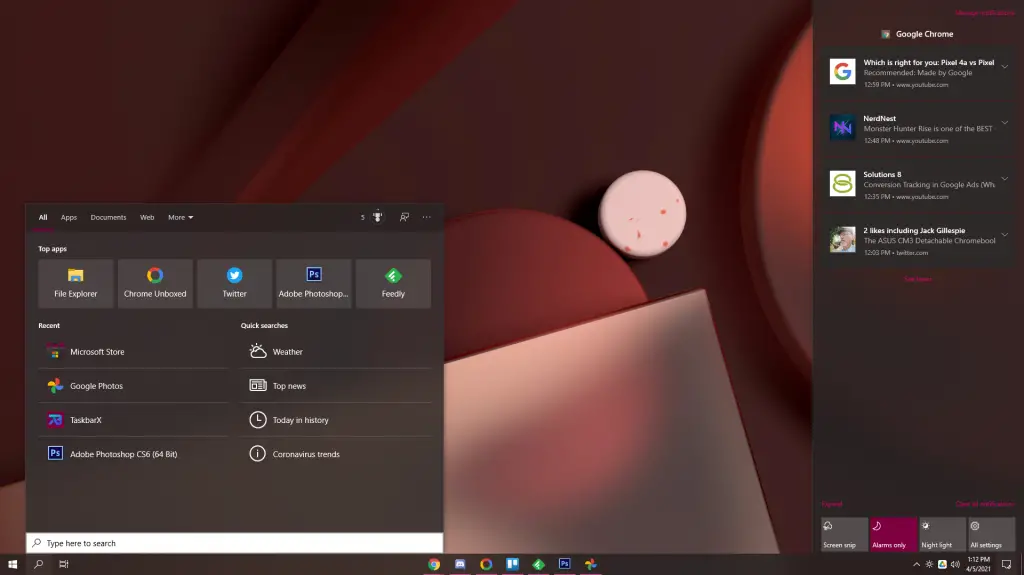
Ever since I began using Windows 10, I’ve been notorious for my hate of the Action Center. For Chrome OS users, this Windows feature most resembles your Chromebook’s quick settings and notifications area. If you go into Chrome’s site settings (chrome://settings/content/all), you can enable desktop notifications for each website that you’d like to send you information when there’s something new. This helps bridge the gap of information delivery for your newly ‘installed’ Chrome web applications.
I also recommend familiarizing yourself with the Action Center’s quick settings options – there’s a Focus Mode, which most resembles the Do Not Disturb option on your Chromebook. There’s a night light feature as well, and even a screenshot tool called Screen Snip. Understanding how to use these will help you feel as though a bit less is missing when you cross over to Windows for work. You can also right-click any tile at the bottom of the action center and click ‘Edit’ to move them around so that the most useful ones appear on top when you collapse that area. Here’s a look at what your Chrome web app notifications, quick settings, and Windows ‘search’ look like once you’ve done all of the above:
Send tabs to yourself across devices
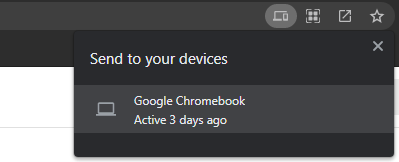
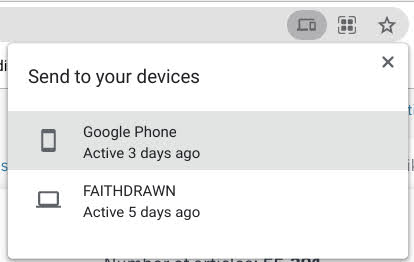
Working cross-OS, you’ll sometimes find that you want a specific website to be utilized on the opposite device. Something you want to read later, or just something you’d like to have up for a later time to take a look at. Chrome’s Omnibox has a new ‘Send to Self’ feature which allows you to ping tabs back and forth between devices. The image below on the left is my Windows 10 PC sending a tab to my Chromebook, and the image below on the right is my Chromebook sending a tab to my phone or PC – pretty useful! The four-square icon to the right of the ‘Send tab to self’ icon is the Dino QR code which is also quite handy. Lastly, you can use the star icon further right to add something to your bookmarks or to your Reading list – all of which synchronize via Chrome Sync cross-device.
Add missing features with Windows Store apps
I know, I know, I’ve knocked the Windows Store plenty in the past for not having nearly as many useful applications as the Google Play Store, and while that remains true, there are a few useful utilities you can grab from it that can transform your Windows 10 experience and give you a bit more of that Chromebook feel while you’re required to use it instead. Here are just a few of them that I recommend:
- Files – A beautiful files app that doesn’t look hideously out of date like the default file explorer (not perfect, but good for most users)
- Twinkle Tray: Brightness Slider – I’m baffled by the fact that Windows 10 for desktop doesn’t have a native brightness slider built-in. This fixes that!
- Modern Flyouts (Preview) – This adds a modern-looking software volume slider and miniature music control center to your system tray.
- TaskbarX – Center your Windows 10 Taskbar icons! Do. This. Now. You can also make the taskbar transparent among a whole host of other tweaks.
Choose which icons show up on the taskbar
Last, but certainly not least, you can choose which icons show up on your Windows 10 taskbar in the system tray area by right-clicking the taskbar and choosing ‘Taskbar settings’ Once the window opens for the settings, scroll down and look for ‘Choose which icons appear on the taskbar’ (it’s a plaintext link, not a button). From there, you can toggle off things like OneDrive (unless you use this), Skype, Network (access via the Action Center instead) and more. Then, enable things like Google Drive, Twinkle Tray, and Volume so that essential features you’re used to using on your Chromebook are front and center.

In summary, none of the aforementioned methods will give you an experience that makes you as productive as you would be on your Chromebook. You could almost say that this guide allows you to ‘turn Windows 10 into a Chromebook’, so to speak, but I would say it’s a far cry from what Google has created with Chrome OS. It’s also a lot of work to attempt to emulate Google’s hard work and dedication to its platform. While File Stream is fantastic, and certainly a step up from Drive Backup & Sync, accessing your Chrome web apps via the Windows 10 ‘All apps’ section is just horrendous, and the Windows Search functionality is just laughable. TaskbarX and EdgeDeflector are great additions, but it just goes to prove that Microsoft has gone through the paces to prevent Windows from feeling modern, in my humble opinion.
Windows 10 can be a fantastic tool for creativity and design, but most of you reading this probably won’t use it for much more than the obligatory piece of software for your day job. I created this guide as a companion to my Edge, Chrome, and the user between article since I already decided to experiment with Windows and Edge this past week. I figured it would be useful for those of you who don’t want to feel completely out of your element when moving between devices. While I call this a comprehensive guide, I’m sure that there are plenty of other things I could think of in order to complete the experience, so if there’s anything you’d like to know about transforming Windows to feel more comfortable when visiting from Chrome OS, please let me know in the comments!
SUBSCRIBE TO UPSTREAM
Get Chrome Unboxed delivered straight to your inbox
Upstream is our flagship, curated newsletter with the top stories, most click-worthy deals, giveaways, and trending articles from Chrome Unboxed sent directly to your inbox a few times a week. Join 31,000+ subscribers.