

Support our independent tech coverage. Chrome Unboxed is written by real people, for real people—not search algorithms. Join Chrome Unboxed Plus for just $2 a month to get an ad-free experience, access to our private Discord, and more. Learn more about membership here.
START FREE TRIAL (MONTHLY)START FREE TRIAL (ANNUAL)
Google Tasks is more powerful than ever thanks to the new Google Chat Spaces integration. Being able to assign tasks to others in a Space, or place them in more versatile categories just makes them much more flexible than they are if you use the standard Tasks app. However, if you’re interested in using Tasks in a Kanban board form and aren’t interested in paying for something like Taskboard, then Trello can be a lifesaver.
Trello has become a go-to project and task management tool for teams across many industries (it’s big with indie game developers too!) but for anyone who loves Google’s ecosystem of services as much as I’ve come to, fragmenting your approach to task management can feel a tad overwhelming. That’s why I’m going to show you how to connect your Google Tasks to a Trello board today!
As a forwarning, this synchronization does not work for Tasks in Google Chat Spaces. I’m sad to report this because I was really looking forward to using the aforementioned flexibility that comes with the revamped Tasks approach there in conjunction with Trello, but alas, it’s not possible at this time! However, if you’re okay with the standard, non-Workspace Google Account Tasks app, then follow along below.
To get started, we’re going to be using a really cool but little-known tool that Microsoft offers called Power Automate. That’s right, Microsoft offers a way for users to automate different combinations of online services (like Zapier) and a bunch of them have absolutely nothing to do with Microsoft apps! You also don’t need to pay anything to use this service for this automation, at least, which is the cherry on top.
There’s a specific automation called “Google Task to Trello Cards“, and you can find it below. Make sure that you’re signed up for Power Automate, and that you’re signed into both it and Trello before clicking the link for the “recipe” under the image.

Notice that this “flow” will first connect to Tasks once you click the blue “Sign in” button seen in the image. You’ll be taken to a Google Account sign-in pop-up. If you have two-step verification on your account, you’ll also need to go through that step before it’s finalized.
After you’ve finished with that, click “Sign in” next to the Trello icon (also pictured above!). Easy peasy, right? You’re essentially just telling Power Automate which two services you want to handshake and force to communicate, even though these aren’t normally able to work together.
Pro Tip: If the “Sign in” button for Trello is greyed out, just refresh the page! We saw this to be a consistent problem with Power Automate, but was easily fixed by tapping F5 on your keyboard or clicking the refresh button on your browser’s top bar.
Okay, both connections are established, right? Click the blue “Continue” button just below that. Here’s where it may get a little confusing, but I promise it’s not so bad. You see, the first box says “When a task is added to a task list” and it has a Google Tasks logo (a really old one at that!). The second box says “Create a card”, and it features a Trello icon.
In the first box, the drop-down for “Task List ID” will let you choose one of your Google Tasks lists. I chose the default list, which I’ve renamed “Field Notes” so that I can quickly add things to it on the go as I used to do with my Bullet Journal Field Notes notebook.
Yeah, that’s the easy part. Let’s move on to the Trello part. In the second box, choose the dropdown box for “Board Id” and you’ll notice that all of the Trello boards associated with that login you used during the connection process will be populated. Choose the board you want your Google Tasks to go to, and move on to the “Parent List Id” box.
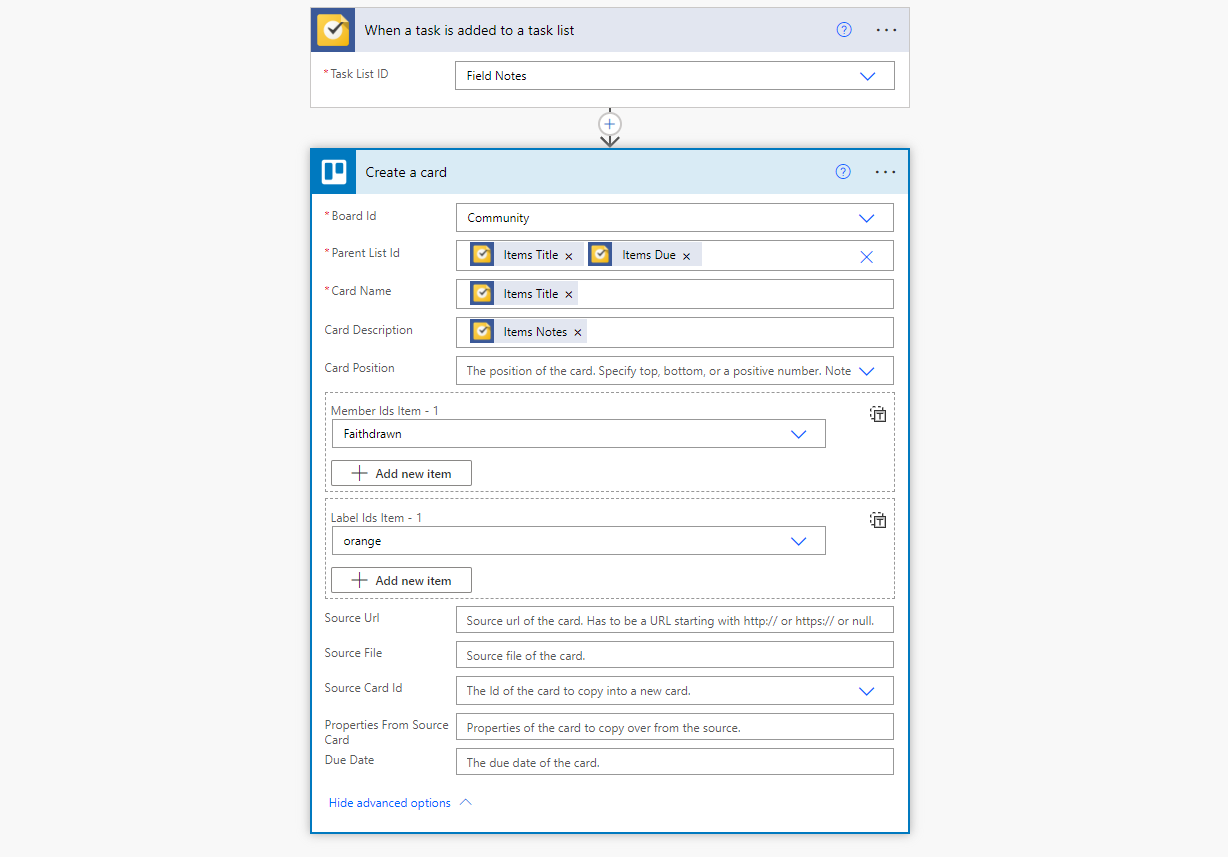
In this box, you’ll choose from a list of properties each created card will have on the Trello board if it comes from Tasks via the automated flow. I like to put “Items Title” to grab the task name and make it the card name, and “Items Due” to place the Task’s due date and make it the actual due date for the card on Trello. This way, I’ve got a 1-to-1 pairing for all of the basic information across both services.
Lastly as far as information is concerned, the “Card Description” box lets you place the “Items Notes” as I’ve done above. This will take the Google Task description and plug that into the card as well. If you don’t look at everything at once, it’s actually quite simple and less intimidating!
Okay, under “Member Ids Item – 1”, just choose which user on Trello will inherit the card automatically once it comes over from Google. You don’t have to do this part, but you can if you’d like. This may be useful if you’re using this flow to work collaboratively with a team on Trello. The “Label ids Item – 1” is also optional, and it lets you automatically tag a card created this way with a color label.
I personally don’t use any other settings here, but you can tinker if you’d like. Otherwise, just go ahead and click the “Save” icon at the top-right of the automation window and you’re done. It may take a bit of time for this to begin working, but go back to Google Tasks and create one, fill out its title, due date, and description, and visit Trello to see it magically appear! Upon checking these cards off or archiving them on Trello, they will be crossed off from Google Tasks and become a part of your “completed” list.
I just want the steps!
1. Sign up for Microsoft Power Automate
2. Make sure you’re signed into your Google Account and Trello on separate browser tabs
3. Visit the Google Task to Trello Cards automation flow link
4. Click “Sign in” next to the Google Tasks and Trello icons one at a time, refreshing the browser if necessary
5. Click the blue “Continue” button
6. Choose your Google Tasks list from the “Task List ID” dropdown
7. Choose your Trello Board from the “Board Id” dropdown
8. Choose “Items Title” and “Items Due” from the dropdown next to “Parent List Id”
9. Choose “Items Title” from the “Card Name” dropdown
10. Choose “Items Notes” from the “Card Description” dropdown
11. Select a card position and assign a user or a color to the card (optional)
SUBSCRIBE TO UPSTREAM
Get Chrome Unboxed delivered straight to your inbox
Upstream is our flagship, curated newsletter with the top stories, most click-worthy deals, giveaways, and trending articles from Chrome Unboxed sent directly to your inbox a few times a week. Join 31,000+ subscribers.