

Support our independent tech coverage. Chrome Unboxed is written by real people, for real people—not search algorithms. Join Chrome Unboxed Plus for just $2 a month to get an ad-free experience, access to our private Discord, and more. Learn more about membership here.
START FREE TRIAL (MONTHLY)START FREE TRIAL (ANNUAL)
Every computer has what’s called a serial number. It’s a unique identifier for that exact piece of hardware which can be used to reference everything from its internal components and manufacturing process to identifying you as its owner. It’s often required in order for hardware manufacturers to locate your warranty information for repairs. Today, we’ll be looking at a few ways that you can locate the serial number for your Chromebook.
Before we get started
If your device is managed through your school or a company you should know that warrantied repairs are processed through your administrator. Do not attempt to fix the device yourself or ship it off to the manufacturer as an individual. Technically, these devices don’t belong to you and you won’t have the authority or information to process the request. G Suite admins use something called Endpoint Verification to locate your serial number, asset ID and more, so there’s nothing you need to do except to inform them that your Chromebook is broken or malfunctioning. Just hand it over and they’ll take care of everything.
If you’re a consumer who is using a Chromebook for personal use, you can find your serial number on the device’s box. It’s usually found on the sticker or on the side, but every box is different. You’re probably reading this though because you threw the box out, if I’m guessing correctly, so your Chromebook should have a sticker on the bottom which will display your serial number too. Talk about redundancy! Now, worst case scenario, your serial number is no longer on the bottom of the Chromebook due to being scraped off or fading with time. Don’t worry, I’ve got you covered. The following methods for locating it are a tad geeky, but they’re not difficult, I promise. If any part of your Chromebook is broken, be it the screen or the keyboard, you can plug in external devices to follow the steps below. If your Chromebook simply won’t turn on, the steps herein will not be useful. You can always contact your seller and see if they process your device warranty on your behalf too. Best Buy’s very own Geek Squad is great at this, for example.
The easy method
The easiest way on the software side to locate your Chromebook’s serial number is by tapping the search button on your keyboard – that is the magnifying glass key where you’re used to caps lock being – and type in ‘chrome://system‘ without the single quotations. Hit enter and you’ll be presented with a ton of geeky information. Scroll down until you see your serial number under the vpd_2.0 category. Be sure to scribble this down on paper and keep it safe until you hand it over to whoever requested it. It’s highly unlikely that anyone would do something malicious with your serial number, but it’s better to be safe than sorry.
The advanced method
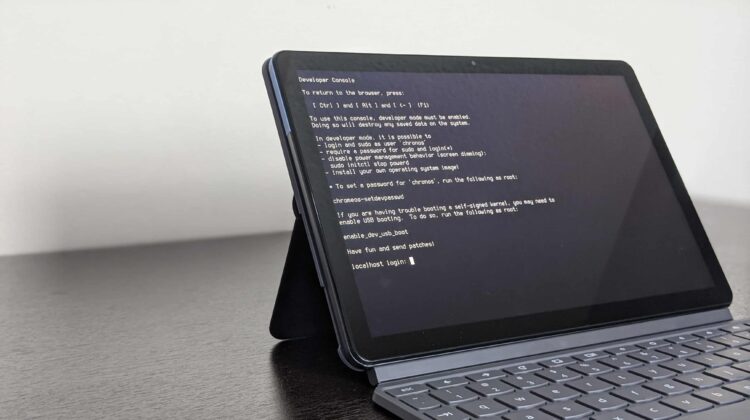
Next, we’ll talk about how to find your serial number using something called VT2 or “Virtual Terminal 2”. If you’re a Linux user, this will probably be something familiar to you. I would not recommend this method to anyone who is uncomfortable or unfamiliar with a more advanced technical approach. First, you’ll need to put your Chromebook into developer mode. Doing so will wipe all of its local data, though your cloud stored data will be fine. Once you’ve set your Chromebook up and are sitting on the log in screen, just press “CTRL+ALT and the forward or right facing arrow on the top left of your keyboard. This will place you into VT2.
Once you’re in the virtual terminal, you will be presented with a line that says ‘localhost login:’. Just type ‘root’ and hit enter. That’s it! Your serial number will be presented on the screen for you. As always, be careful when trying new things with your Chromebook and because we should have an obligatory disclaimer – understand that any changes you make may void your warranty and the manufacturer will hold you solely responsible. We hope this helps in dire situations for those who are having trouble locating their serial number!
SUBSCRIBE TO UPSTREAM
Get Chrome Unboxed delivered straight to your inbox
Upstream is our flagship, curated newsletter with the top stories, most click-worthy deals, giveaways, and trending articles from Chrome Unboxed sent directly to your inbox a few times a week. Join 31,000+ subscribers.