There are several reasons why you may be interested in changing the system language of your Chromebook. First, you may have accidentally chosen English or another language other than your own during the setup process when you were prompted, and want to swap it out for your native tongue without having to powerwash your device.
Maybe, you’re learning a second language and want to immerse yourself by displaying your entire digital account in that language. Others still may be bilingual or multilingual and want to jump back and forth for comfort and ease of use. Whatever the case, we’re going to show you how to do so step by step today, so follow along!
Changing Your System Language
Alright, first, you’ll need to open the “Settings” app on your Chromebook. To do this, either click on the clock at the bottom-right of your device shelf and then click the cogwheel icon near the top of that new pop-up, or tap the “Everything button” on your keyboard – that’s where Caps Lock used to be, and it looks like a magnifying glass icon! – and type in “Settings”. Once it appears in your search results, click the cogwheel icon.
Pro Tip: You can also tap the “Everything button” on your keyboard and type in “Language” to go directly to the correct area of the settings app automatically.
Next, navigate to the “Languages and Inputs” section using the left-hand sidebar or by typing it into the search box at the top of the settings app. Click “Languages”, and then click “Change” next to “device language”. Type in the language you’d like to add and select the blue “Confirm and restart” button.
1. Open the Settings app
2. Click “Languages and Inputs” on the left side bar
3. Click “Languages”
4. Select “Change” button for “Device language”
5. Type in your language of choice
6. Click the blue “Confirm and restart” button
Just give me the steps!
Translating Web Pages in Your Language
However, unless you follow this next step, web pages that you visit will not be translated. Instead, only your system interfaces and so on will appear in your new language. You can see in the examples I’m providing today that I’ve applied Japanese to my system since that’s what I’m learning right now, but yours will be based on whatever you’ve added in the previous step.
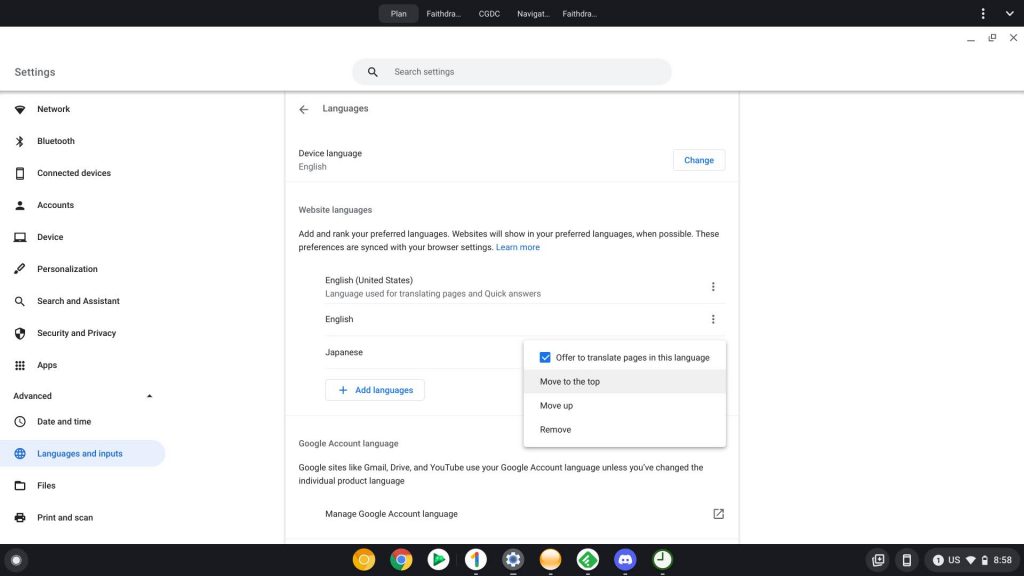
To fix this, just go back to the “Languages” section of the Settings app and you’ll see a “Website languages” area. Click the “+ Add languages” button, type in your language of choice, and select it. Then, be sure to tap the three dots “more” menu to the right of the newly added language, and choose “Move to the top” to rank it as the primary language that Chrome will attempt to translate webpages into.
1. Open the Settings app
2. Navigate to the “Languages and Inputs” section
3. Select “Languages”
4. Under “Website Languages”, tap “+ Add languages”
5. Type in the language you’d like to add
6. Tap the three dots menu to the right of the newly listed language
7. Select “Move to the top”
Just give me the steps!
Important: Only change this setting if you’d like all of your web pages across all of your devices to be translated into the new language. This setting syncs with Chrome!
Changing Your Input Methods
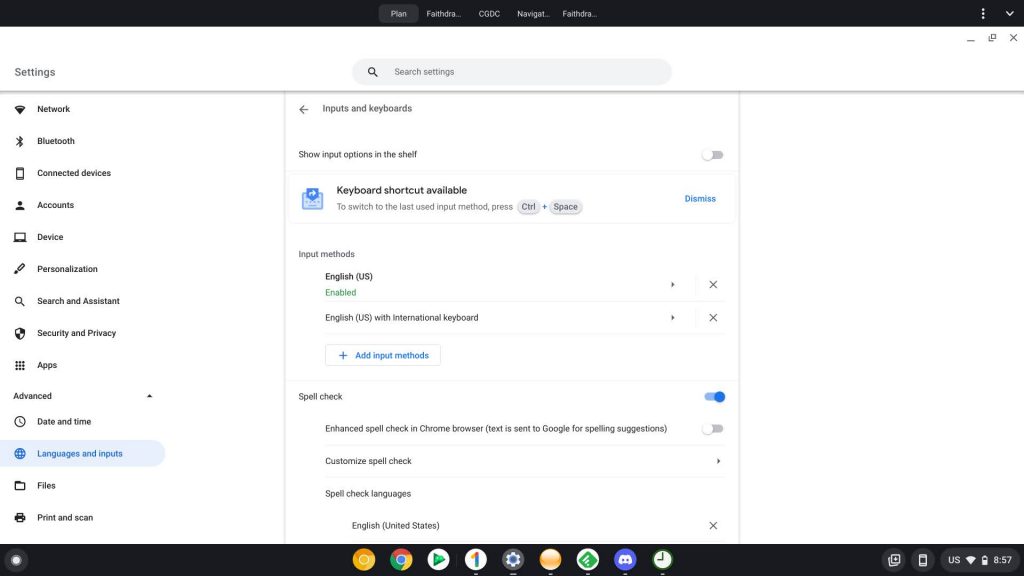
Okay, so now, your Chromebook and browser is translating everything properly and providing the correct output, but what about inputs? You’ll want to type in your native language using your Chromebook’s keyboard, of course, so let’s do that next. In the same “Languages and Inputs” section of the Settings app, choose “Inputs and keyboards”, choose “+ Add input methods”, search for the same language, and select it.
Don’t forget that you can add several input methods here. In the case I’m using today, I’ll want not only Japanese, but also the “Alphanumeric with Japanese keyboard”, and the “Japanese with US keyboard” so I have more options.
1. Open the Settings app
2. Navigate to the “Languages and inputs” section
3. Choose “Inputs and keyboards”
4. Click “+ Add input methods”
5. Type in and select your new language
Just give me the steps!
Changing Your Account language
Another way that you can change your language across the board is to change it globally via your Google Account settings! In the same “Languages and Inputs” section of the Settings app, go to “Languages”, and scroll down to “Google Account language”. From here, you can click the square with an arrow icon as seen below to be redirected to your Google Account on the web.
Changing your account language will actually apply across all services like Gmail, Drive, and Youtube, but if you manually change one of the languages for a site, it will be excluded. You can also directly visit this setting on the web by visiting your Google Account’s language page.
1. Open the Settings app
2. Navigate to the “Languages and inputs” section
3. Click “Languages”
4. Scroll down to “Manage Google Account language”, and click it
5. Select “+ Add another language”
6. Type in and select your new language
7. Click the up arrow to make it your preferred language
Just give me the steps!
Quickly Swapping Between Languages
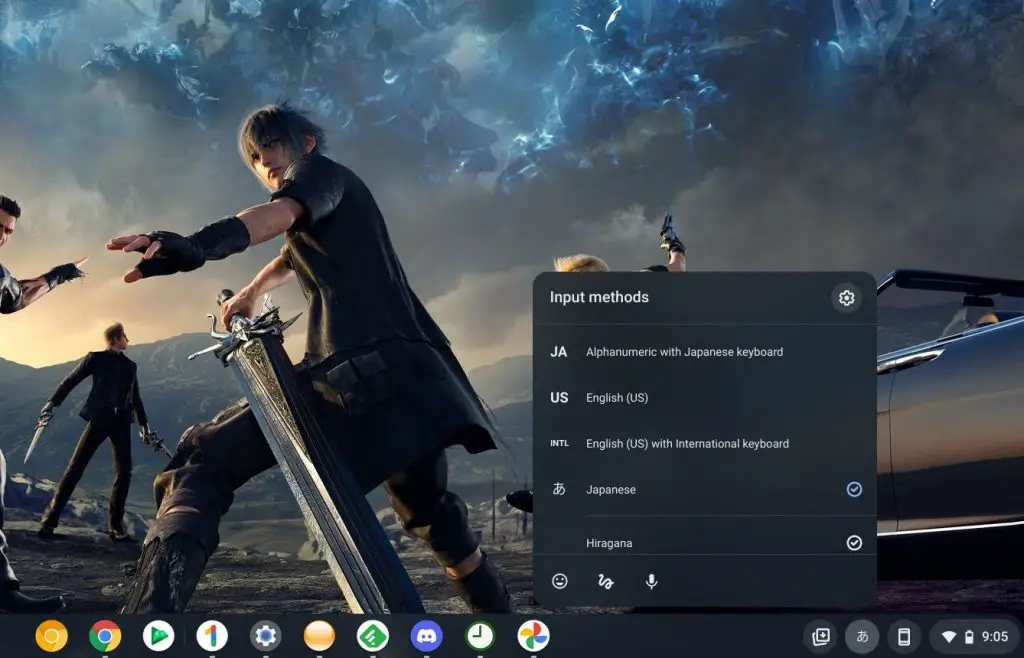
Great, almost done! The last step is to show you how you can quickly swap between input languages on your Chromebook without having to constantly open the Settings app. You can either be sure to choose “Show input options in the shelf” in the “Inputs and Keyboards” section of the Settings app and/or you can use the keyboard shortcut found below to jump between them effortlessly. In addition to your input methods, you’ll also see voice, emoji, and handwriting input by tapping the “Input methods” icon on your shelf.
Pro Tip: The fastest way to swap between input languages is to use the keyboard shortcut “Ctrl + Shift + Space”. If you’ve chosen to show input options on your shelf in the previous step, you’ll see the icon at the bottom-right of your screen change.
1. Open the Settings app
2. Navigate to the “Languages and inputs” section
3. Click “Inputs and keyboards”
4. Toggle “Show input options in the shelf”
5. Click the newly added input options button at the bottom-right of your Chromebook shelf
6. Select new input method or use keyboard shortcut
Just give me the steps!
Alright, that’s it! You’ve now changed not only your system’s language, but also your input methods, and even possibly your Google Account language. While this was a bit longer for something that many people may find pretty simple, we wanted to create a comprehensive guide for all Chromebook users of any skill level. We hope that this can serve as a go-to resource for you and your friends or family as they get their first Chromebook.
Join Chrome Unboxed Plus
Introducing Chrome Unboxed Plus – our revamped membership community. Join today at just $2 / month to get access to our private Discord, exclusive giveaways, AMAs, an ad-free website, ad-free podcast experience and more.
Plus Monthly
$2/mo. after 7-day free trial
Pay monthly to support our independent coverage and get access to exclusive benefits.
Plus Annual
$20/yr. after 7-day free trial
Pay yearly to support our independent coverage and get access to exclusive benefits.
Our newsletters are also a great way to get connected. Subscribe here!
Click here to learn more and for membership FAQ


