


Support our independent tech coverage. Chrome Unboxed is written by real people, for real people—not search algorithms. Join Chrome Unboxed Plus for just $2 a month to get an ad-free experience, access to our private Discord, and more. Learn more about membership here.
START FREE TRIAL (MONTHLY)START FREE TRIAL (ANNUAL)
 Whether you are new to Chromebooks or have used one for some time now, there are some tips and tricks involving the touchpad that, for me at least, have become perhaps my favorite part of a Chromebook. I’d like to share those with you so you can master your Chromebook touchpad as well.
While the touchpad experience on Windows laptops is starting to finally get better, it is not completely there for many. Though Microsoft introduced the Precision Touchpad integration in Windows 8.1 and 10, there are still a ton of laptop makers not taking advantage of this protocol. It is solid and unified and makes using a touchpad on Windows a much more pleasurable experience for those manufacturers that choose to utilize it.
Mac OS has had the touchpad experience nailed for years, and I still think their implementation is the best. Great touchpads, cool features, and buttery gestures have cemented Macs as having the best touchpads available.
Chrome OS has implemented touchpads in much the same way as Apple did right from the start. From the ground up, the Chrome OS touchpad is treated like a touch device, not a mouse input. This leads to great tracking, scrolling, swiping and gesture control.
While the implementation is not as broad as what you’ll find on a Mac, the Chrome OS touchpad is a powerful tool that is both easy and a pleasure to use. I’d rank the experience a close second to Mac, only because with some cheaper Chromebooks you may get a cheap touchpad that hinders the experience a bit.
So, with such a powerful tool at the base of every Chromebook, we thought it a good idea to cover all the great things your touchpad can do.
The Basics & Settings
First, lets talk about some setting options. There aren’t many to deal with here. The settings can be found if you navigate to Settings > Touchpad and Mouse Settings.
Before clicking that button, you’ll see one important setting, as shown below:

From here, you can adjust the cursor speed for both a touchpad and mouse, depending on which you have connected at the time.
Once you click into the Touchpad and Mouse settings, you’ll be met with this screen:
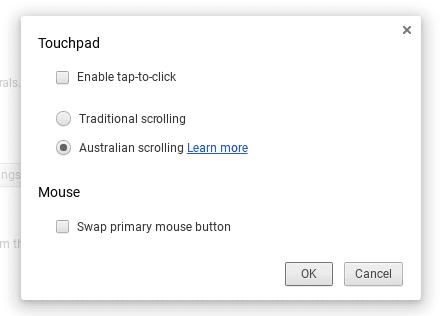
There’s not much there, and that isn’t a bad thing. One addition many of you won’t see on this screen is the Mouse options. I have a mouse plugged in for this screen shot, so Chrome OS quickly dropped that setting in.
First up, we have tap to click. This is exactly what it sounds like. For those who prefer a tap to a physical click, you can opt for this. If you do this, when we speak in a second about multi-finger clicking, you can substitute multi-finger tapping. Double-tap and drag works for your drag-and-drop scenarios here as expected.
Next we have tranditional vs. Australian scrolling. It’s a cute name, and all it implies is that your scrolling works in the opposite direction versus traditional scrolling. For me, this makes way more sense. With a touch screen, when I touch the surface of the screen and move my finger from the bottom to the top, I expect the content to move in the same direction as my movements.
This is all Australian scrolling does. It behaves like a Mac or modern Windows machine and makes a lot of sense. This is still not the default, however, so you’ll need to enable it to have your touchpad scrolling in a more natural way. It is worth noting that this has no effect on the mouse scroll wheel.
Lastly, you can swap right and left buttons on your mouse by selecting the final option if you so choose.
More Advanced Actions
So, I’m going to assume most of you know that dragging a single finger across the surface of your touchpad will move your cursor.
It also likely goes without saying that a single click (or tap, remember) selects items on the screen. Beyond that, let’s talk about the other clicks and gestures.
Right Click: Simply click with two fingers anywhere on the touchpad. You may also hold ALT and single click with one finger.
Scrolling: Scrolling can be done both vertically and horizontally (when applicable) by dragging 2 fingers across the surface of the touchpad. This is where your choice on traditional/Australian Scrolling will come into play.
Forward/Back Browser Navigation: This one will depend on your scrolling direction in settings, but in a browser window, dragging two fingers left or right (when there is nothing to scroll on the page) will elicit a back/forward navigation. When in Australian scrolling mode, a 2-finger swipe to the right takes you back, just like hitting the back key at the top of your keyboard. Going to the left takes you forward in your browser history. These gestures would be opposite if in traditional scrolling mode.
Open Window/App Overview: To see all your open windows/apps, simply swipe three fingers together upward (for you Australian scrolling folks) or downward (traditional). This will display all open windows together for you to choose which one to bring to the front. Simply single click on your choice. Do the opposite 3-finger swipe down or up to exit this screen.
Switch Between Tabs: This is a super-handy trick. With a 3-finger swipe left or right, you can quickly scroll through your tabs in a browser window. One of my favorites!
Close Tab: A quick, 3-finger click anywhere on a tab in the browser will close that tab. Again, small but effective!
Open Link In New Tab: Similarly, a 3-finger click on a link will automatically open it in a new tab.
While there is nothing earth-shattering here, these tricks can help you become much more productive within just a few minutes. We hope they help some of you out!