As I previously stated in my Google Keep bulk editing article, Keep is one of my favorite services that the company offers. It’s lightweight and versatile in its offerings, even if those offerings are fairly vanilla. I actually love that about it. Where other notetaking services are complex and offer many features, Keep keeps it simple, and that’s its strength. Today, I wanted to give you ten tips and tricks for getting the most out of your notetaking in Google Keep, so let’s get started!
1. Manage notes in bulk
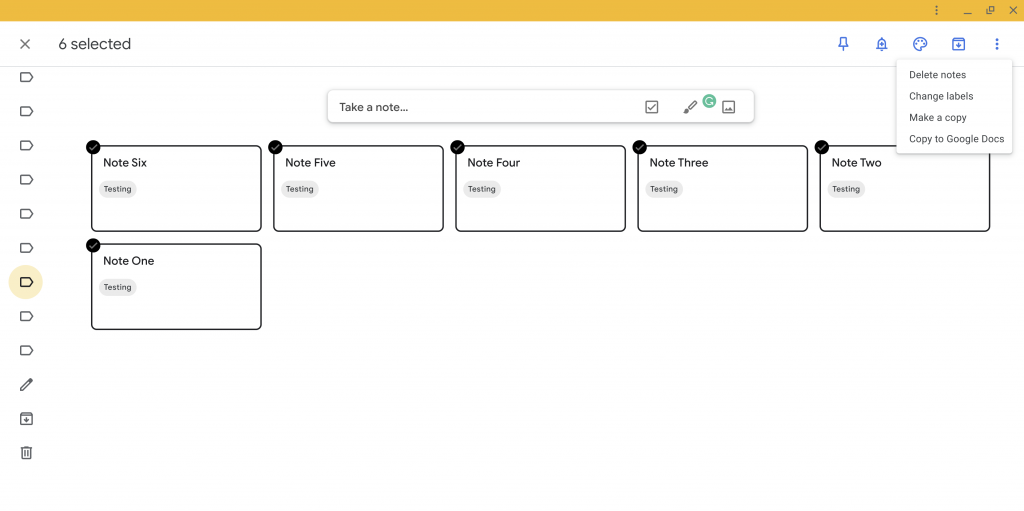
Did you know that you can manage your notes in bulk instead of having to modify them one at a time? It’s true! Clicking down your mouse just outside of a note and dragging across many will select them. You can also press “Ctrl + A” in order to select all of them, but this may be more useful within a label as opposed to grabbing every note you’ve ever written.
Once selected, you can do any number of things with them. You can move them to a label, change their color, delete them, make duplicates, and even copy them all to a Google Document in one fell swoop. It’s easy to overlook the power tools here in a service that’s all about only one individual note being in your purview at a time during editing.
2. Insert notes into Google Docs from sidebar
Another great tip is that you can take notes on the go using your phone and then dump them into a Google Doc when you sit down at your Chromebook. This puts your notes to work and swings them into action to help you formulate ideas in more concrete ways.
Just visit a new Google Doc, open the right-hand sidebar using the Keep icon, and drag and drop a note into the body of the document. Like magic, it will drop in not only text, but headers will be separate, and links and images will also be dropped in! If you’re multi-selecting notes in Keep directly as we previously discussed, then you can copy to a Doc and see that it’s actually dumped in all of the data from all of the notes into one text document – that’s powerful!
3. Apply new backgrounds
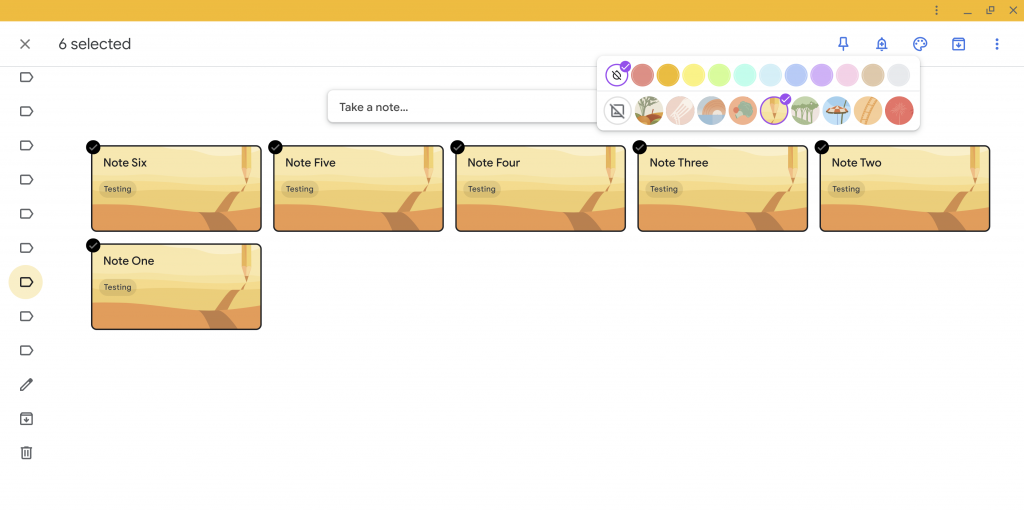
Were you aware that the new backgrounds from Google Keep’s mobile app have now made their way to the web? I noticed this a few weeks ago and just couldn’t wait to talk about it. In just the same way that you would select a note and apply color to it, you’ll now see a host of new image backgrounds that give you more choices.
I’ve actually been waiting for this feature to expand its availability, and here it is. There are nine new note backgrounds that you can apply to help differentiate your stickies from one another. Just keep in mind that if you have applied color to a note, the background will not be applied. Strip notes of their color if you’d like to give them a little more life with these new choices.
4. Power up Keep with extensions
Just because Google Keep looks and acts a certain way as it’s offered from Google, doesn’t mean that you can’t modify to your liking! There are a few great extensions on the Chrome Web Store that can help you spice things up with your notetaking.
While there is an official Keep extension for capturing things from around the web, you should be sure to check out Category Tabs, Full Screen Edit, Input Tab, Popup for Keep, Window Resizer, and more.
5. Create notes and lists using Google Assistant
One of the best tips that I can think of for Keep, and one of the ones I use least because I keep forgetting is that you can tell Google Assistant to create notes on your behalf! By saying “Hey Google, take a note” Then, it will ask you what you want to write with your voice. After you speak a sentence of phrase, it will capture it in Keep where you can visit it in text form at any time. You can also pull up your notes by saying “Hey Google, show me my notes”.
If you want to use Keep as a shopping list, you’ll just need to visit Google Assistant’s settings, go to “Notes & Lists” and set Google Keep as your default notes service. Upon saying “Hey Google, add [fill in the blank] to my shopping list”, it will add it in Keep instead of Google Shopping Lists on the web.
Set reminders and view them from Google Calendar
Potentially the most useful trick on this list is that you can (and should) integrate Google Keep notes into your Calendar. It’s actually really easy to do – you just set a reminder on the note itself! The moment you do so, it will appear on that time and date in Google Calendar.
The best way to make use of this is to create Google Tasks for reminders and things you need to get done and to use Notes for things that are more long-form. Setting a reminder and seeing them on the Calendar at the appropriate time means that you can see and manage your entire day in one place without jumping between apps.
6. Toggle Dark Mode
It’s no secret that Google’s Dark Mode efforts are taking too long and are full of inconsistencies, but that doesn’t mean you can’t use Dark Mode on Keep right now. It’s actually implemented really well. Notes and the background behind them all have a dark slate grey color, and it’s much easier on the eyes.
The only problem is that you have to toggle it manually on and off each time – it’s not automated as it should by now! To turn on Dark Mode for Keep, just visit the cogwheel icon at the top-right of the window, and choose ‘Enable Dark Theme’.
7. Take advantage of rich previews
If you’d like to bring your notes to life and integrate modern link previews with thumbnails instead of having to look at hideous text links by themselves, then visit the cogwheel icon again at the top-right of the window, go to ‘Settings’, and check the box next to ‘Display rich link previews’.
After you paste a link in a note and save it, you’ll see a new preview appear attached at the bottom of the note shortly thereafter. One little-known fact is that you can turn standard links you previously pasted in into rich links by opening a previously created note, waiting a second, and closing it again.
8. The often overlooked Search feature is powerful
Instead of using Keep to simply take notes and to find them visually with your eyes, did you know that you can click into its search bar to type things in? Of course you did! Well, did you know that this is a rich search section that presents you with a list of your labels, colors, recent collaborators, and more?
My favorite way to use Keep is to search via images or other topics that the service auto-generates here. It’s pretty great and helps you use Keep as a sort of journal. Seeing all of your drawings or sketches, mind maps, notes tied to movies, food, and so on is a fantastic way to squeeze more use out of it!
9. Learn Keep’s best keyboard shortcuts
Keep is great via touch, and even via a mouse and keyboard, but were you aware that you have many more keyboard shortcuts that you can take advantage of in order to engage in rapid notetaking?
Tapping the cogwheel one last time at the top-right of the screen and choosing ‘Keyboard shortcuts’ will reveal a whole host of fantastic, quick options for managing your notes. You can navigate between notes by pressing “J”, or “K”, you can create a new note just by tapping “C”, searching is quickly done by pressing “/”, and so on. Be sure to check out all of the shortcuts when you find the time!
10. Toggle one column mode to increase focus
Alright, let’s wrap this up. One way that I’ve found more clarity and focus while looking at the massive amount of notes that I have in my Keep library is by toggling on what’s called list mode. The standard or default view for your notes is a “grid” view each note is aligned next to the others for as wide as your screen is.
Pressing “Ctrl + g” on your keyboard or pressing the icon at the top-right of the screen that shows four squares arranged into one larger square will force-align all of your notes into a center stacked view. I find that when I’m looking at one note at a time in a label, it’s much easier to get my bearings without feeling overwhelmed.
If you found anything useful in this list of tips and tricks for Keep, please let me know in the comments below! I use the service every single day, and I love it even though I wish Google would add some rich formatting tools. Anyways, enjoy, and have fun!
Join Chrome Unboxed Plus
Introducing Chrome Unboxed Plus – our revamped membership community. Join today at just $2 / month to get access to our private Discord, exclusive giveaways, AMAs, an ad-free website, ad-free podcast experience and more.
Plus Monthly
$2/mo. after 7-day free trial
Pay monthly to support our independent coverage and get access to exclusive benefits.
Plus Annual
$20/yr. after 7-day free trial
Pay yearly to support our independent coverage and get access to exclusive benefits.
Our newsletters are also a great way to get connected. Subscribe here!
Click here to learn more and for membership FAQ


