


Support our independent tech coverage. Chrome Unboxed is written by real people, for real people—not search algorithms. Join Chrome Unboxed Plus for just $2 a month to get an ad-free experience, access to our private Discord, and more. Learn more about membership here.
START FREE TRIAL (MONTHLY)START FREE TRIAL (ANNUAL)
I’m going to be honest: we’ve put this post off for a very long time. You see, there are certain folks who will undoubtedly get upset when I publish this information because by sharing it, I come across as flippant about the greater Chrome OS community and the issues and trials the Canary Channel (and Dev Channel, for that matter) will most definitely cause for many of you. So, before I go any further, consider yourself warned very clearly right here, right now. The Canary Channel is wildly unstable at times and things you wouldn’t normally blame the OS for are legit issues when you are in Canary.
For instance, we build our website on WordPress and there are countless times where Chromebooks in the Canary Channel will not function properly with WordPress. Hardware issues arise. Crashes happen frequently. Simple tasks become work lost and, honestly, apart from trying a new feature out while it is still on the bleeding edge of availability, I stay far away from this part of the Chromebook experience.
However, I know there are still those of you that love experimenting and you love digging around to see what’s coming. Trust me, you are among kindred souls, here. So that’s why I’m relenting and putting this info on our site. We reference the Canary Channel frequently and yet we’ve never explained how to get there or how to leave when you are done. The process is a bit tougher than what you have to do for Beta and Developer Channels, but it isn’t too bad.
The main issue is you have to switch to Developer Mode, removing the secure, verified boot feature from your Chromebook. Because this is such a security risk, we can’t recommend you ever stay in Canary Channel for long. Get in, look around, and get out. You’ve been properly warned, but I’ll ask one more thing. If you have issues – any issues – please don’t go asking for help in help forums or chat rooms. Just follow the directions back to Stable Channel and get back to your life. All set? Good. Let’s dive in.
Getting into the Canary Channel
First things first, to get to Canary, you first need to be in Developer Mode. To get there, you need to go through the Chrome OS Recovery process and this will take a bit of time. Here’s a link to Google’s official page with all the nitty-gritty details. Want the short version? At any point, hit ESC + REFRESH + POWER and you’ll immediately enter Recovery. From there, press CTRL + D and you’ll be prompted about entering Developer Mode. Depending on your device, this screen may read differently, but follow the prompts to agree and continue. Keep in mind, once it starts, this process can take 10-20 minutes. After you’ve done this, you’ll have to hit CTRL + D every time you reboot (or select ‘Boot from internal disk’) to get past the initial recovery screen. Just a head’s up. Since we can’t get these steps in a screen grab, we have a video that shows some of it for you to see if you need some visuals.
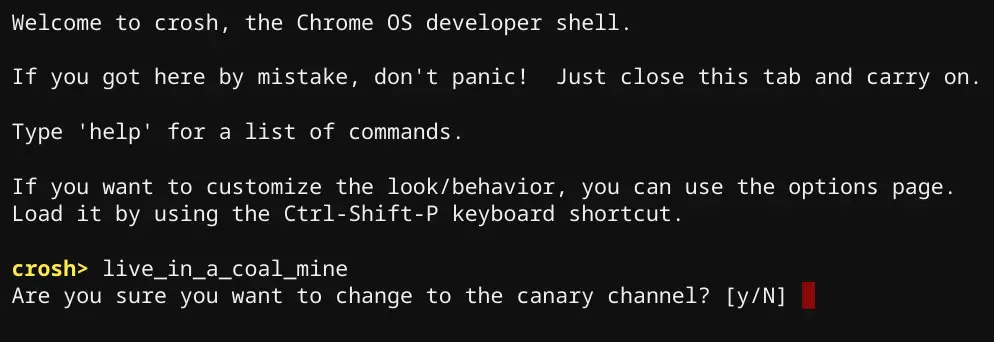
Next up, once you are booted back in Chrome OS in Developer Mode (things won’t look any different than what you are used to), you’ll need to enter CrOSH – the Chrome OS Developer Shell. This is done simply by hitting CTRL + ALT + T on your keyboard. Once this new terminal interface opens, there’s a command that needs to be inputted letter for letter, and it is:
live_in_a_coal_mine
Yep, that’s acutally it. You can type it our or just paste it in CrOSH via a simple right-click after you’ve copied the text above. Once you’ve done so, simply hit enter and the system will make absolutely sure you really want to do this. Once you agree, an OTA update will begin downloading to your device and you’ll be prompted to restart once it is installed just like any other update to Chrome OS. Pretty easy, right?
How to leave the Canary Channel
Alright, you’ve looked around and tested what you were intersted in and now it’s time to go back to a more-stable reality. Easy, just switch channels in the Chrome OS settings, right? No need for an explanation, here! Except, it’s not that simple. Unfortunately, there’s a bit of work needed to get out of Canary as well.
Go back to CrOSH (CTRL + ALT + T) and type the following commands, hitting the enter key between them:
shell

update_engine_client --channel=stable-channel -update
Again, your Chromebook will begin downloading and installing the latest available Stable version of Chrome OS and when it is done, you’ll get prompted to restart and update. Just like rolling back from Developer or Beta Channel, you’ll lose all your locally stored data in this process, so be aware of that.
At this point I’d recommend also leaving Developer Mode before you get anything set up. After your device reboots from moving back to Stable, you’ll still get the Recovery screen, so take that opportunity to re-enable secure, verified boot. When you do, your Chromebook will restart again and you’ll be completely secured and back to Stable as if nothing ever happened.
As an additional tip, you can also get out of Canary by flashing a recovery image, and we outline that process in another video if you end up needing to go this route. I’d recommend avoiding that if at all possible, however.
So, that’s it. If you’ve followed along, you now know how to get into and out of the Canary Channel on your Chromebook. By now you’ve likely already done it, so I guess I won’t warn you any further. Just get out of there before your Chromebook shuts off randomly and you lose whatever it was you were working on. Don’t make us say we told you so. Please? Good luck.
SUBSCRIBE TO UPSTREAM
Get Chrome Unboxed delivered straight to your inbox
Upstream is our flagship, curated newsletter with the top stories, most click-worthy deals, giveaways, and trending articles from Chrome Unboxed sent directly to your inbox a few times a week. Join 31,000+ subscribers.