


Support our independent tech coverage. Chrome Unboxed is written by real people, for real people—not search algorithms. Join Chrome Unboxed Plus for just $2 a month to get an ad-free experience, access to our private Discord, and more. Learn more about membership here.
START FREE TRIAL (MONTHLY)START FREE TRIAL (ANNUAL)
Chrome OS continues to mature and become a more well-rounded platform for its users. The latest update to version 59 brought with it a few minor, albeit, crucial additions to our favorite operating system.
While many are still awaiting the Google Play Store to hit their Chromebooks, the Chromium team has added a new printing feature to Chrome OS. This may not be a glamorous addition but it is one that has been needed and asked for as long as Chromebooks have been in existence. Chromebook users can now print to wireless printers on the same network without having to set up Google Cloud Print.
We will cover the steps in just a moment but first I want to preempt them with a disclaimer. We are already seeing reports of this feature not working properly for a number of printer. I have been able to successfully print to a couple of printers but have also failed to print to another. At this point, it looks like it’s very hit and miss and the only way to know is to try it out. Don’t worry though, you can’t break anything doing this. 🙂
Now, let’s get started.
Hardware
You will need three things before you begin.
- Chromebook or Chromebox
- A wireless-capable printer
- A wireless network connection
Follow the manufacturer instructions for you printing and connect it to your wireless network. If you haven’t already, power up your Chromebook, log in and connect to the same network you are using for the printer. Take your time, I’ll wait. Okay, ready?
Add Your Printer
Now, before you sit down to your Chromebook, find your printer’s IP address. You can generally find this in the settings menu under “wireless network” or something similar. If you are having trouble finding it you can always check out the support pages on the manufacturer’s website or user manual. While you’re still at the printer, grab the model number too. You’ll need that later.
Have a seat and kick back. You’re ready to add your printer to you Chromebook.
From your Chromebook click your account photo in the bottom right corner of your screen. From there follow these steps:
- Click the gear icon to open the settings menu
- Scroll all the way down and click “Advanced”
- Find the Printing section and click “Printers”
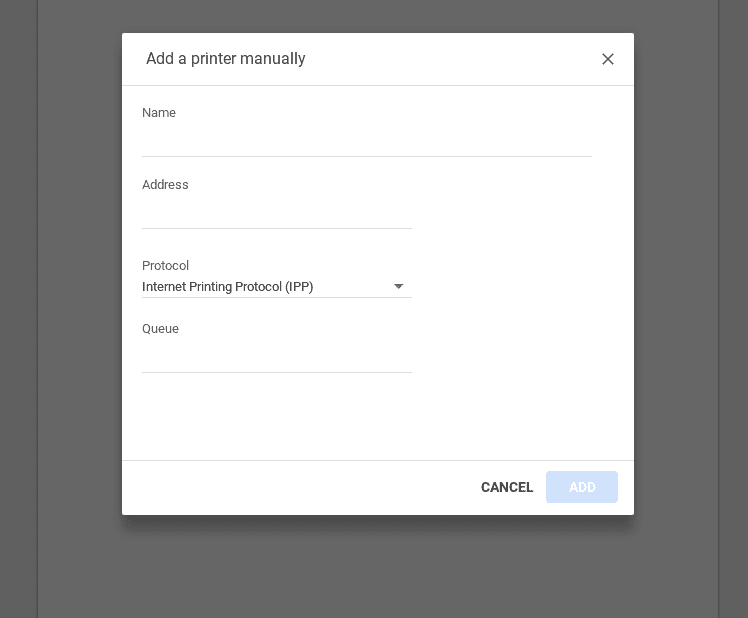
- Select “add printer”
- Pick a name for your printer (it can be anything you want)
- Add the printer’s IP address
- Select a protocol (most printers will be IPP)
- Select a Queue (most will be ipp/print, I left mine blank and it still worked)
- Click Add

At this point you should be greeted by a box that will let you select the manufacturer and model of your printer. You should have that written down if you’re a good listener. Just saying.
If you cannot find your printer on the list Google has some additional steps to use a generic option. You can find them here. Alternatively, there is an option to upload a driver if you happen to have one saved on your Chromebook.
Once you’ve done all that simply open a document, hit ctrl+p, select the local printer you added and print. You will know pretty quick if it was successful.
I have this working on an HP OfficeJet 6500 and also received confirmation that it worked on the HP 8000 series. I have yet to get the Brother All-in-one here at the office working but am still giving it a go with different settings. It will be up to the developers and manufacturers to ensure the drivers for their devices are made available to Chrome OS in order for this feature to work. If you try it and get nothing, I suggest downloading the driver from the manufacturer and attempting the upload method.
I’d love to hear what printers you’ve been able to use with this new feature. Drop a comment and let us know. Happy printing, locally.