0:00
hey guys Gabriel with chrome unboxed and
0:02
today we're talking upgrades a few weeks
0:04
ago we talked about all the new chrome
0:05
boxes on the market and the asus
0:07
chromebox 3 is by far the easiest to
0:10
upgrade so today we're gonna take a look
0:12
inside and see what it takes to put some
0:13
extra RAM in this bad boy
0:21
before we get into this this video is
0:24
brought to you by Nord VPN it's the VPN
0:26
of choice for millions for staying safe
0:28
while browsing at home or while you're
0:29
out you can use it across any platform
0:32
and it's great for Chromebooks and any
0:33
other device if you'd like to learn more
0:35
go to Chrome on box comm forward slash
0:37
Nord VPN alright guys so right here we
0:41
have the asus chromebox 3 this is the
0:43
seller on model the poor selection is a
0:45
little different around the outside as
0:47
opposed to the other ones but on the
0:48
inside they're all practically the same
0:50
so you can do this with any any light
0:52
generation just about any chrome box at
0:54
all really before you get started you're
0:56
gonna need some tools the right tool for
0:58
the right job right so you can pick up
1:00
one of these all-in-one PC tool kits on
1:02
Amazon for like I think I got this one
1:04
for like $18.00 we have a few of them in
1:07
our shop and we'll drop a link below but
1:08
you've got all your key all your bits
1:11
and everything you need your plastic pry
1:13
tools all the other things that you need
1:15
and it comes with this this is a
1:17
grounding strap anyone who works on pcs
1:20
will tell you that you need to use one
1:21
of these I can honestly say I've never
1:23
used one but I have booked a device too
1:27
so I do recommend that you use it for
1:30
demonstration purposes during this video
1:31
I'm not going to you simply put the
1:34
grounding strap around your wrist and
1:35
then you will clamp this to the end of
1:38
the power cable where there's exposed
1:40
metal or the chassis of the device but
1:42
anyways moving on so we're gonna flip
1:44
this over and you'll see four feet on
1:47
the bottom the first time you take these
1:49
off it is going to feel like they are
1:51
concreted don't worry it's just some
1:53
really strong double-sided tape once you
1:55
take them off the first time they
1:57
generally come off fairly easily just
2:00
got to get under it pop them right off
2:03
once you have them off you'll see there
2:06
are four screws exposed on the bottom
2:09
and then for this I'm using a 2.5
2:13
Phillips head that come in this kit and
2:15
you're gonna take these screws out
2:21
you can always have one of those nice
2:23
little mats that you can work on it has
2:25
a place for all of your screws and your
2:26
bits and everything so you don't lose
2:28
them I'm just gonna cross my fingers and
2:30
hope we don't lock any of this stuff in
2:32
but again the ASIS is the easiest to
2:35
take apart out of all them I've taken
2:37
the Acer and the HP apart the Acer is a
2:40
absolute pain the Asus has four screws
2:46
flip it over to give it a little jiggle
2:48
and the bottom will come right off it's
2:50
attached by the power port that is a
2:53
four poem you can just pull it off set
2:56
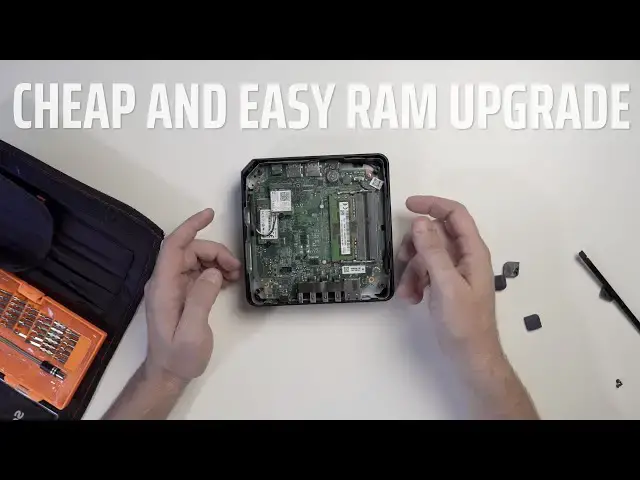
it aside and there you go you have the
2:59
insides you have two RAM slots the SD
3:02
card the wireless card and now we're
3:05
gonna take this out two pins on the side
3:08
slide it right out these come with a
3:11
four gig ddr4 you can put ddr3 in these
3:16
if you want but you can pick these up
3:18
pretty cheap I actually found this exact
3:20
one on Newegg for about 22 dollars we'll
3:22
drop a link below if you want to grab
3:24
one so you can upgrade this to eight
3:25
gigs or and for $22 you can go all the
3:28
way up to 16 some people have done 32 it
3:31
technically supports it but I think 16
3:33
is pretty good amount of RAM for this
3:35
type of device so you're just going to
3:38
take your RAM these are going to be 260
3:41
pin you can see the slot right in the
3:42
middle lines up with this you're gonna
3:45
slide the new slot in press it down
3:48
until it clicks and you're good to go
3:51
now if you did want to upgrade the hard
3:53
drive because this one comes with 32
3:55
gigs it's similar you have one screw
3:58
that holds it down you're gonna take
4:04
don't stab the board it's gonna pop up
4:09
let's slide this out take the secondary
4:19
screw out that's gonna pop right up and
4:22
slides right out and you can replace it
4:24
with another MDOT two we have seen
4:28
people have actually put in VME in this
4:30
you just need to make sure you're
4:31
getting the right size and that it'll go
4:32
in there but other than that that's a
4:35
really really easy upgrade to a device
4:37
for really little amount of money all
4:39
right so yeah you get your new hard
4:41
drive you're gonna slide it right back
4:42
in press it down put your screw back in
4:47
side note this is how I've worked the
4:49
ACE with chrome box that I have on
4:51
pretty sure I ground that's something
4:53
when I was putting the hard drive back
4:54
in but anyways so firmly but not too
4:57
tight seat that screw back in now you're
4:59
gonna put your wireless card back in the
5:00
same way and tight your screw then
5:04
you're going to take your power supply
5:06
and reconnect it and up your ports back
5:16
down put your four screws back in your
5:20
feet might have lost their adhesion you
5:22
might need to put a little double-sided
5:24
tape on there or you can just leave them
5:25
off if you don't care about the rubber
5:26
feet and then once your screws are back
5:29
in you have a freshly upgraded asus
5:32
chromebox three guys this is a really
5:35
easy way to turn the device into
5:36
something a little bit better for a
5:38
little little amount of money we
5:40
actually have this device available on
5:41
our shop for two hundred and fifteen
5:43
dollars a new sticker ram and maybe a
5:45
hard drive you've got two hundred
5:47
seventy two hundred eighty dollars
5:48
invested in a device that's gonna last
5:50
you five six years and it will do just
5:53
about anything that you need so guys we
5:55
hope you liked the video subscribe click
5:58
the thumbs up if you liked it and don't
5:59
forget to click that notification bill
6:01
because we're gonna be doing some more
6:02
tear downs in the future on some devices
6:04
that aren't quite as easy as this but
6:06
let us know what you think and if
6:07
there's something you like to see drop a
6:09
comment below we'd love to check it out